Creating a baby journal with TiddlyWiki 5
Keeping a journal about your baby is fun. There are plenty of online services that can help to keep such a diary, but you need to have an internet connection to access them, and you have to trust them to keep your data safe.
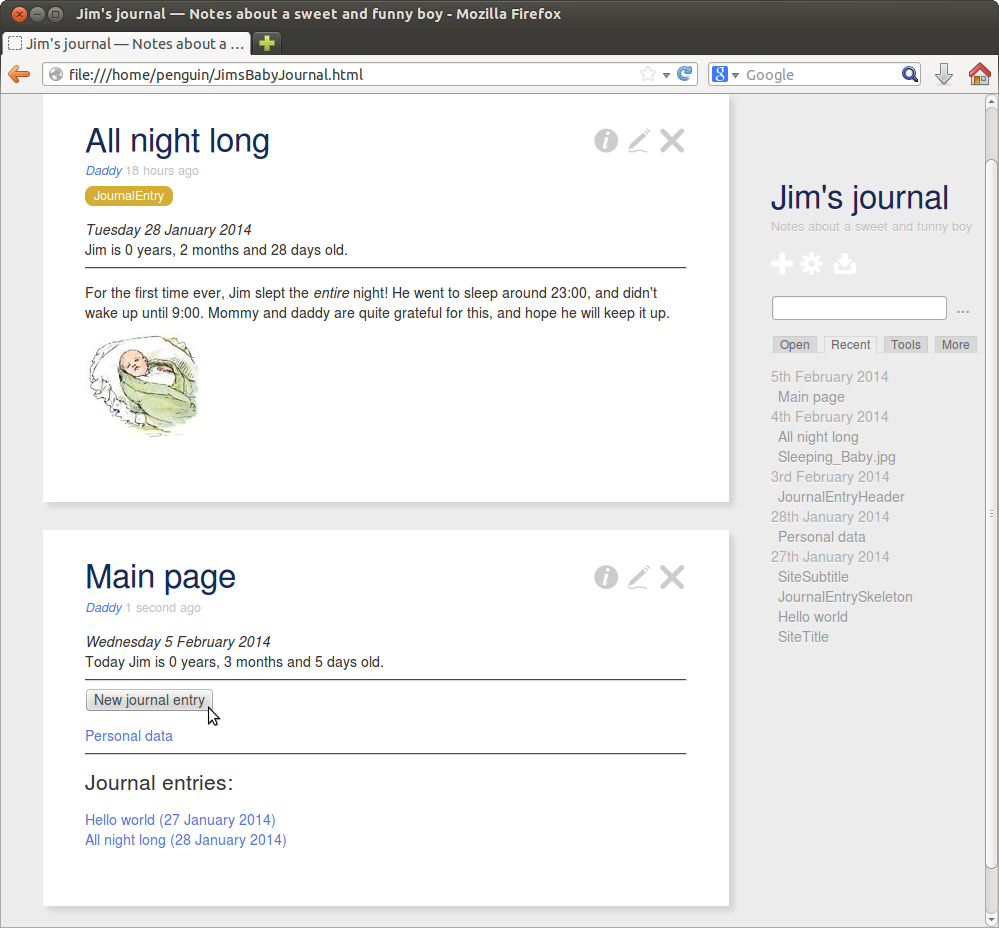
This blog post descibes how to keep a journal that will also be available to you when you're offline. It will be just one file that you can store anywhere and view or edit with any modern web browser. Journal entries can contain rich text and images, and automatically show the entry's date and your baby's age at that date:
TiddlyWiki
The journal will be based on TiddlyWiki 5, created by Jeremy Ruston. Now, this is a blog mainly about developing software, and here's where things start to get all technical and fun. However, if you're a non-technical parent who just came here looking for a simple baby journal application, you may (almost) stop reading, download the finished version of the file we're about to create over here, unzip it, open BabyJournal.html in your favourite browser, enter your baby's details in the Personal data section and start creating journal entries. I think it all works pretty straightforward, but do remember to click the big Save button before exiting your browser. Check the TiddlyWiki website for any additional help.
Still reading? Excellent. So I mentioned TiddlyWiki. It's an interesting piece of software that implements a wiki type of application in a single html file which contains all the html, JavaScript and css needed to run the application as well as the data that the user puts into the wiki. It's highly customizable and has many different uses. For our baby journalling purpose, we will create a faily standard TiddlyWiki file with one customization: the entry's date and the baby's age will appear at the top of each journal entry.
Getting started
To start creating the journal, you need an empty TiddlyWiki. Download it at http://www.tiddlywiki.com by clicking the large green button that says Download Empty. Save the file wherever you like, and then open it with your browser. Let's start by giving your journal a title. Click the Control Panel button and enter a title at Title of this TiddlyWiki, and maybe a subtitle at Subtitle. Then click the Save button (see above). Your browser will ask you for a location to save the file, which can be the same location where you originally saved the file.
There, that was the basic process of editing the TiddlyWiki file: open it in the browser, make some modifications and then click Save. Of course, the saving process is a bit awkward with that file requestor. For Firefox, it can be made a one-click affair by installing an extension. You could also use TiddlyDesktop which is a standalone application providing a browser and easy management of TiddlyWiki files. See the TiddlyWiki website for more information.
The first tiddler
In TiddlyWiki, information is stored in tiddlers. They are comparable to pages or articles in other wikis. Let's create a tiddler that contains some general information about your baby. Click on the big + button and enter as title for the new tidder: Personal data. In the text area below the title you can write whatever you like about the baby, but there are 2 special bits of information that we want to use in other parts of the journal too: the baby's first name and birth date. To easily access these from elsewhere, we put them in fields. At Add a new field, enter
firstnameand click the Add button. Now you can enter a value for the field, so enter your baby's first name. Repeat the process for the new field
birthdateand enter the baby's birth date in the notation yyyymmdd (for example if the baby was born on 31 October 2013, enter 20131031). Finish the creation of the new tiddler by clicking ✓. This stores the new tiddler in memory, but not yet on disk. To also save it on disk, click the large Save button again (see above).
Now you can use the values of these fields wherever you want with syntax:
{{Personal data!!firstname}}and {{Personal data!!birthdate}}For example, as title (in Control Panel, see above) you could set: {{Personal data!!firstname}}'s journalThen your baby's name would appear in the title. You'll notice that after saving, the Personal data tiddler doesn't show these 2 fields and their values anymore; they're only visible in edit mode, not in view mode. To also see them in view mode, the text of the tiddler should explicitly reference them. Click on the tiddler's pen icon to modify it and write the following wikitext into the tiddler's text area, which will show the field names and values in a table: Here the tiddler's name can be omitted before the !!, because it's the current tiddler itself. By the way, the tiddler's text is actually also a field of the tiddler. It's a standard field that any tiddler has, whereas the 2 new fields you just added are custom fields that only the Personal data tiddler has.
|Birth date (yyyymmdd): |{{!!birthdate}}|
|First name: |{{!!firstname}}|
Importing a tiddler from another TiddlyWiki
As said in the introduction, we want to show the date of a journal entry in its header. Unfortunately TiddlyWiki has no built-in support for showing dates. It does support macros to add custom functionality though, so let's make a JavaScript macro to do it. Actually someone already made such a macro, so you just need to import it into your journal. To do this, open a new browser window and in it, go to Stephan Hradek's site http://tiddlystuff.tiddlyspot.com and click on the link to the tiddler "dateTimeMacro". At the bottom of this tiddler, there is a link called $:/macros/skeeve/dateTime.js. Drag and drop this link into your journal (from one window to the other). Now you have a macro for showing the date of a tiddler. Have a look at it to get a general idea about what JavaScript macros look like in TiddlyWiki. (If you can't see it anymore: it should be in the More -> System section of your Control Panel.)Creating your own JavaScript macro
Before we go on using the dateTimeMacro to create the journal entry header, we need one more macro there: to calculate and show the age of your baby. This macro you will have to make by yourself. Create a new tiddler and call it $:/macros/penguin/age.js. Set its Type field to "application/javascript". Add a field called "module-type" and set it to "macro". Then, in the tiddler text paste the following JavaScript code that implements the macro:For any JavaScript macro in TiddlyWiki, the exports object needs 3 attributes: name for the macro name (age), params for its parameters (birthDate and currentDate) and run for the function to run when it's invoked.
(function(){

"use strict";

exports.name = "age";

exports.params = [ { name: "birthDate" }, { name: "currentDate" } ];

exports.run = function(birthDate, currentDate) {
  var getNormalizedDate = function (date, referenceDate) {
    var numberOfDaysInMonth = (new Date(date.getFullYear(), date.getMonth()+1, 0)).getDate();
    if (numberOfDaysInMonth < referenceDate.getDate()) {
      return numberOfDaysInMonth;
    }
    else {
      return referenceDate.getDate();
    }
  }
  var getAgeString = function (birthDate, currentDate) {
    var tmpBirthDate = new Date(birthDate);
    var tmpCurrentDate = new Date(currentDate.getFullYear(), currentDate.getMonth(), currentDate.getDate());
    if (tmpCurrentDate < tmpBirthDate) return "not yet born";
    tmpCurrentDate.setHours(12);
    var ageDays = 0;
    while (tmpCurrentDate.getDate() != getNormalizedDate(tmpCurrentDate, tmpBirthDate)) {
      ageDays++;
      tmpCurrentDate.setDate(tmpCurrentDate.getDate() - 1);
    }
    tmpCurrentDate.setDate(1);
    tmpBirthDate.setDate(1);
    var ageMonths = 0;
    while (tmpCurrentDate.getMonth() != tmpBirthDate.getMonth()) {
      ageMonths++;
      tmpCurrentDate.setMonth(tmpCurrentDate.getMonth() - 1);
    }
    var ageYears=0;
    while (tmpCurrentDate.getFullYear() != tmpBirthDate.getFullYear()) {
      ageYears++;
      tmpCurrentDate.setFullYear(tmpCurrentDate.getFullYear() - 1);
    }
    return ageYears + ' year' + (ageYears == 1 ? '' : 's') + ', ' + ageMonths + ' month' + (ageMonths == 1 ? '' : 's') + ' and ' + ageDays + ' day' + (ageDays == 1 ? '' : 's');
  };

  if (typeof(currentDate) == "undefined" || currentDate == "" || isNaN(currentDate)) {
    currentDate = new Date();
  }
  else
  {
    currentDate = new Date(currentDate.substring(0,4), currentDate.substring(4,6) - 1, currentDate.substring(6, 8));
  }
  if (typeof(birthDate) == "undefined" || birthDate == "" || isNaN(birthDate)) {
    birthDate = new Date();
  }
  else
  {
    birthDate = new Date(birthDate.substring(0,4), birthDate.substring(4,6) - 1, birthDate.substring(6, 8));
  }
  return getAgeString(birthDate, currentDate);
};
})();
Defining the header for journal entries
Now you can create the header that will appear at the top of all journal entries. Create a new tiddler called JournalEntryHeader and paste the following text in it:This looks rather complicated, so let's see what's happening there.
<$list filter="[is[current]tag[JournalEntry]]">
//<$macrocall $name="dateTime" ts={{!!created}} format="DDD DD MMM YYYY"/>//<br>
{{Personal data!!firstname}} is <$macrocall $name="age" birthDate={{Personal data!!birthdate}} currentDate={{!!created}} /> old.<hr></$list>
The whole header is enclosed in a $list construct. This list has 0 or 1 elements, depending on the tiddler in which it appears. It's a rather awkward construction, but it basically says: show information about the current tiddler, but only if this tiddler has tag JournalEntry. This way, we can include the header in all tiddlers (which is easiest to do, see below), while it only shows text for some tiddlers.
Inside the list, our 2 macros are used. First there's the dateTime macro which will show the tiddler's creation date (the field created) in the format "name_of_weekday monthday name_of_month year". It's enclosed by // to make it appear in italics. Then there's a line that shows the baby's age. It references the baby's name set in Personal data and then calls the age macro which computes the age at the tiddler's creation date, given the birth date defined in Personal data.
To include the header in all tiddlers, you just need to add a tag $:/tags/ViewTemplate to the JournalEntryHeader tiddler. However, that doesn't include it at the top of the tiddler, but at the bottom. It's kind of expected for a header to appear at the top, so let's make sure that happens. For this, open the tiddler $:/tags/ViewTemplate (to be found in Control Panel -> More -> Shadows) and edit it. In its field "list", insert JournalEntryHeader before $:/core/ui/ViewTemplate/body. Now the header will appear before the tiddler's body.
Now you can test the macros. It's important to note that a new macro doesn't work until you save the tiddler and then refresh the browser, so first do that. Then create a new tiddler and add a tag JournalEntry to it. Type some text and a title, and then save the tiddler. The new tiddler should now show the header with the date (today) and the baby's age. If not, you may have made a typo in one of the macros or elsewhere. Maybe you noticed that the header was not shown while you were editing the tiddler. To also show the header in edit mode, you need to do with $:/tags/EditTemplate what you did with $:/tags/ViewTemplate.
Putting things together: the main page
Now it's time to bring everything together and finish the journal. Let's create a tiddler entitled Main page and make sure it's always visible when we start the journal. To ensure that, go to Control Panel and put [[Main page]] in the Default Tiddlers.The main page's header
At the top of the main page, let's put information similar to what's in the headers of journal entries, but now related to the current date. So when you open the journal, you'll always see the current date and your baby's current age. This is accomplished by calling the macros without the currentDate argument (which makes it default to now). Put the following at the top of your Main page tiddler:
Note the much shorter syntax for the dateTime macrocall: <<.>> instead of <$macrocall>..</$macrocall>. This shorter syntax can't always be parsed correctly, which is why elsewhere we use the longer one.
//<<dateTime format: "DDD DD MMM YYYY">>//<br>
Today {{Personal data!!firstname}} is <$macrocall $name="age" birthDate={{Personal data!!birthdate}} /> old.<hr>
A button to create new journal entries
Creating a new journal entry is still pretty awkward: first you have to click the button to create a new tiddler, then you need to assign a JournalEntry tag to it. Luckily we can do both in one click by adding a custom "Create journal entry" button. This button will create a new tiddler based on a template (a "Skeleton" in TiddlyWiki terminology). In this template, then, you can specify what stuff you want to be in every journal entry. This is at least the tag JournalEntry, and maybe some fields for specific data you want to keep track of, such as weight, height, number of full nappies... So create a new tiddler called JournalEntrySkeleton and add the tag JournalEntry to it plus any other stuff you want to be in each journal entry, and then add the following to the Main page to make the button appear there:
<$button message="tm-new-tiddler" param="JournalEntrySkeleton">New journal entry</$button>
A table of contents
Finally, it might be useful to have a list with links to all journal entries you created, plus a link to the Personal data tiddler. Add the following to the Main page tiddler:Here the $list construct is used again, this time to actually produce a list (as opposed to just those 0 or 1 lines in the JournalEntryHeader). It lists all tiddlers with tag journalEntry except the skeleton, sorted by creation date.
[[Personal data]]
<hr>
<h2>Journal entries:</h2>

<$list filter="[tag[JournalEntry]!title[JournalEntrySkeleton]sort[created]]"><$link to={{!!title}}><$view field="title" /> (<$macrocall $name="dateTime" ts={{!!created}} format="DD MMM YYYY"/>)<br></$link>
And there you have it, a baby journal made with TiddlyWiki 5. I can't guarantee that your baby will be interested to read it when he/she's older, but it will surely be a fun document for you and your partner to look back on those exciting but often exhausting baby years.
Links
- Empty baby journal, ready to use: https://github.com/redmond-penguin/baby-journal-tiddly/archive/main.zip
- TiddlyWiki website: http://www.tiddlywiki.com
- TiddlyWiki community forum: http://groups.google.com/group/TiddlyWiki